ABSTRACT
The Health care System is a device that can measure the body temperature and the heart pulse frequency of the user. The real time measured values are displayed in the LCD Display. The device is configured to be connected to a PC to allow an off-line analysis of the data.
The temperature is measured by using a LM35 sensor that permits precision measurement. The heart pulse frequency is measured by using a LED and a LDR putted over the finger. This function can be improved since the results are highly variable. Anyway in this project is demonstrated that it’s possible to measure the heart pulse by using a LDR and a LED. The device is provided also with a serial port to communicate the data to the computer. No PC software is developed yet but a simple one can be interfaced with this device. The communication functionality can be tested with a testing software.
TABLE OF CONTENT
ABSTRACT............................................................................................................................... 2
INTRODUCTION..................................................................................................................... 4
HOW THE HEALTH CARE SYSTEM WORK....................................................................... 4
HARDWARE............................................................................................................................. 5
SOFTWARE IMPLEMENTATION........................................................................................... 7
RESULT AND COMMENTS.................................................................................................. 13
REFERENCES......................................................................................................................... 14
APPENDIX A – CODE........................................................................................................... 15
INTRODUCTION
Digital and analog project is one of the Lund Tekniska Högskola courses. The goal of this project is to design and implementation a working prototype device that measure a human body’s temperature and heart pulse frequency. The system will show the temperature live through a digital LCD display. Moreover the system will give the ability to the user to see his heart pulse frequency. The device can be connected to the PC for sending the data of measurement. Future application could be develop a software that permits analysis on the data sent by the device.
While a temperature measurement is quite easy to implement, the pulse frequency measure needed a more complex structure. The purpose of our project is to demonstrate that the pulse measure can be made using a LED and LDR sensor. At the end of the report some suggestion to improve this measure will be provided. Finally the serial communication function is implemented in the microprocessor. No special PC software has been developed to interface with the device, but it is prepared to simply interface to the PC by implementing a software that can only read and write on the serial port.
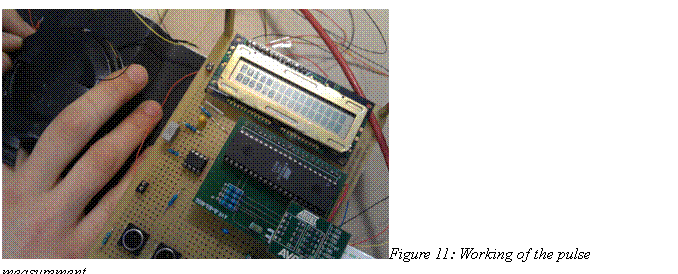
In the figure 1 the system is shown.
HOW THE HEALTH CARE SYSTEM WORK
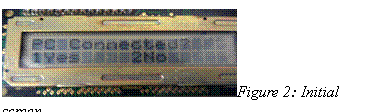
In the beginning of using the system, a text message show in the LCD display “PC is connected?” and the user have two options to answer; one is YES, by pressing in the button one. Second is NO, by click on the button two. Figure 2 shows this process.
After the choices you can see a message on the LCD display that ask the user to choice which type of measurement want to do; button one is to choice the pulse and button two to choice the heart measurement. Figure 3 shows this step.
 |
When the user is getting a measure can come back to the initial screen at every time by pressing the reset button (button 3). The reset button can be useful also if the user is trying to connect the device with the PC even the PC is not connected yet: the user can see the message 'Waiting PC' and by pressing the reset button can come back to the first home screen. If a PC connection is established and the user is getting a measure, he can send the actual value of the measurement to the PC by pressing any button in the keyboard. Note that the serial communication is tested at this moment with the PC test software “Hyper Terminal”: the user have to open a serial communication by this software with the same value of the device (baud rate = 9600bps, no parity bit, no flow control, 1 stop bit) and then press the key '1' to establish the connection.
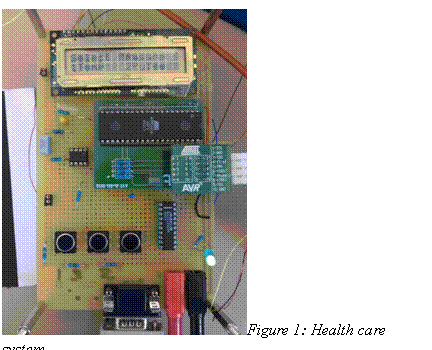
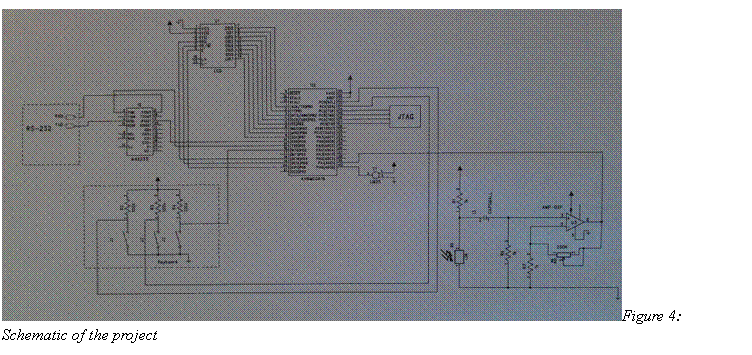
HARDWARE
The main structure of the system consists of:
• Display SHARP dot-Matrix
• Processor ATMega16
• LDR sensor, LED light and interface circuit with amplifier
• Simple Keyboard with 3 buttons
• Serial port and Multichannel RS-232 Drivers/Receivers MAX233A
The figures below show the block and schematic diagram that are description of how our system is connected.
Processor
Main characteristics of Atmega16 those are useful for this project:
• 16K Bytes of In-System Self-Programmable Flash
• Clock frequency up to 8 MHz, that is the choose frequency
• 8 channel AD converter with 10 bits
• up to 32 I/O ports
• 8-bits and 16-bits counters (timers)
• Programmable Serial USART
Temperature Sensor, LM35
The LM35 is considering one of the simplest precision integrated-circuit temperature sensors. LM35 is working with a proportional relation between the output voltage and the temperature. In the LM35 each 10 mV equal to one Celsius degree and this give a simple way to calculate the real value of the temperature.
The physical connection of the sensor is shown in the figure. Note that isolation is needed to use as a thermometer since the contact and humidity of the skin can cause short-circuit.

Display, Sharp Dot-Matrix
The LCD display is a simple display that is fed it with 8 data bits and 3 control bits. LCD uses 5*7 dot matrix to show each character is the LCD screen. Dot matrix display has 80 byte DDRAM that uses to calculate the transform of the characters code to a character. LCD displays the character in a matrix with 2 rows and 16 columns.
Simple Keyboard
The used keyboard consists of three buttons. Each button is a simple switch, as it's possible to see in the schematic, figure 4. In this report every button is referred with a number: the left one is the number 1, the middle one is the number 2 and the right one is the button 3 or reset button. The buttons are used to choice the different function of the device. Note that when a button is released the microprocessor receive a 5 V signal and a 0 V signal when the user presses it. For this reason a pull-up resistor is needed in the design.
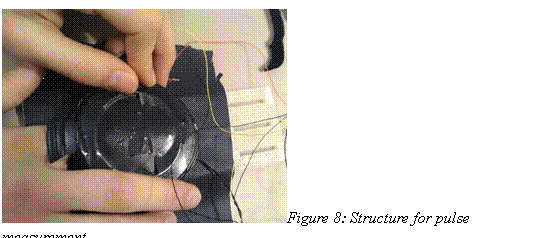
LDR, LED and conditioning circuit
The needed LED is a powerful one to give a high intensity light. The LDR is a resistor that changes its resistance depending on the light received on its surface. The LDR is putted in a half bridge circuit to detects the resistance changing, that's depends on the intensity light changing. Then an amplifier is needed to better detect the pulse in the output signal and to adapt the range of the output signal to the range 0-5V in input to the AD converter. The gain of the amplifier is selectable with a potentiometer but it's usually set around 200.
MAX233A
To make a serial connection between the microprocessor and PC a MAX233A component is needed. The reason behind this is to transforms a 0V signal in a +10V and a +5V signal in a -10V. It is necessary otherwise the electrical level of the communication of the microprocessor and the PC will be different. Note that this component requires a supply voltage of +5V.
SOFTWARE IMPLEMENTATION
➢ MAIN PROGRAM
The algorithm implemented by the microprocessor is represented in the following diagram:
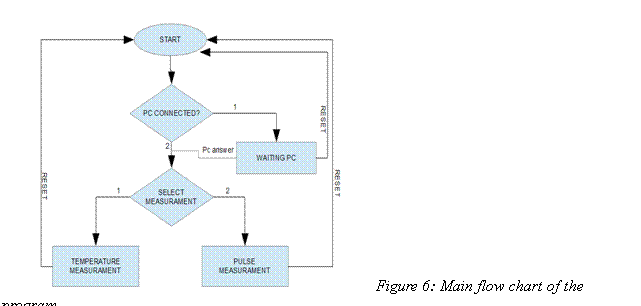
The program starts and the user have to choose if the device is connected to the PC and which kind of measurement that user want wants. At every choice an instruction is written into the LCD display to help the user for going on. The program waits until the user press button 1 or button 2. The function button() reads the value of the pin connected to the button signals. A button is only a switch: normally the output signal is high and when the switch is pressed becomes low. The function alternately read the two output signal: when detects that one signal is become low, it wait 200ms to avoid debouncing (glitch) and returns the number of the button when it detects a following high level.
When a measurement step is reached, it's continuously running to allow the user to see a real time measure. To come back to the initial point a reset function is available: when the button 3 is pressed an external interrupt is detected by the microprocessor. The interrupt routine changes the value of the global variable EXIT that is set to 0 at the beginning of the program. During the execution of the measurement part, if the variable EXIT is equal to 1 the execution stops running and comes back to the beginning of the program at the label START.
The interrupt is configured at the beginning of the program with the function set_interrupt(): the interrupt from external source 0 are enabled on the rising edge here. While in the function enable_interrupt() the global interrupt is enable and the flag is cleared (to avoid that previous interrupt requested when they were disabled are executed). The function SIGNAL (SIG_INTERRUPT0) is needed to set the routine to execute when INTERRUPT0 is requested. There is also the possibility to use the RESET button when the user is waiting for the connection with the PC: if the device is not connected to any PC by the serial port the device can come back to the initial point pressing the RESET button.
At the beginning of the main program the functionality of the pins is established by the function set_pin(): each pin of every port is set as output or input pin.
➢ COMMUNICATION WITH LCD
The connection between the microprocessor and the LCD Display is realized with 8 data bits and 3 control bits (RW, RS and E). Every time that microprocessor sends data to the LCD the signal sequence is the following:
1. Setting RS and RW, that depends on the type of operation. If the operation is of the same kind of the previous one these signals are already set. The functions set_write_IR() and set_write_DR() can set the control pins RS and RW to allow the microprocessor to send an instruction or a data to the display.
2. Setting data pins. The function write_data_LCD(char data) puts the output data in the data pins.
3. Disable signal E, that is normally high. The function disable() do this.
4. Enable signal E. The function enable() do this.
5. Wait for a time needed for the operation. Each operation needed a certain time to be executed. If you don't wait this time before sending new commands to the LCD Display, the actual operation can be not executed. You can find the time for each operation in the datasheet.
At the beginning of the main program the LCD is set with the function initial_LCD(), where some initial instruction are sent to the LCD. In the code there are also some other utilities functions to easily program the communication between the microprocessor and the LCD (clear_LCD(), next_line_LCD(), write_char(char letter)). The function write_int_LCD(int a ) allow to write directly an integer number in the LCD: each digit of this number is calculated and sends to the LCD.

➢ TEMPERATURE MEASUREMENT
The temperature sensor used to measure the
temperature gives an output voltage of![]() . This means that the maximum output voltage
will be less than 1 Volt. The microprocessor acquires this value with an ADC
Converter. The conversion gives a 10bit output values and it is working with a
reference voltage of 2.56V to have more sensibility. A single shot conversion
is processed every time: the conversion is enable setting pin ADSC in
the register ADCSRA (function start_conv()) and terminates
returning the converted value in the ADCL and ADCH registers. The
algorithm to obtain a temperature value is represented in the figure 7. The
formula for calculate the temperature is
. This means that the maximum output voltage
will be less than 1 Volt. The microprocessor acquires this value with an ADC
Converter. The conversion gives a 10bit output values and it is working with a
reference voltage of 2.56V to have more sensibility. A single shot conversion
is processed every time: the conversion is enable setting pin ADSC in
the register ADCSRA (function start_conv()) and terminates
returning the converted value in the ADCL and ADCH registers. The
algorithm to obtain a temperature value is represented in the figure 7. The
formula for calculate the temperature is ![]() , where
, where ![]() is the output of the conversion. The reason
behind using 1000 in the equation above is to transform mV in °C. There is now
a factor 10 between the calculate temperature value and the real value because
in this way it's simpler to work with numbers with one decimal place. As it's
possible to see from the algorithm then an average is calculate over N
measures. The average increases the precision of the measurement and cuts off
the noise, in this application
is the output of the conversion. The reason
behind using 1000 in the equation above is to transform mV in °C. There is now
a factor 10 between the calculate temperature value and the real value because
in this way it's simpler to work with numbers with one decimal place. As it's
possible to see from the algorithm then an average is calculate over N
measures. The average increases the precision of the measurement and cuts off
the noise, in this application ![]() , that's a good compromise between precision and
time elaboration, and the delay caused my this it's practically inappreciable.
Function temp_measure()
, that's a good compromise between precision and
time elaboration, and the delay caused my this it's practically inappreciable.
Function temp_measure()
is implemented to make all these operation.
The calculated temperature value is continuously displayed in the LCD. In this way a real time measure is achieved.
➢ PULSE MEASUREMENT
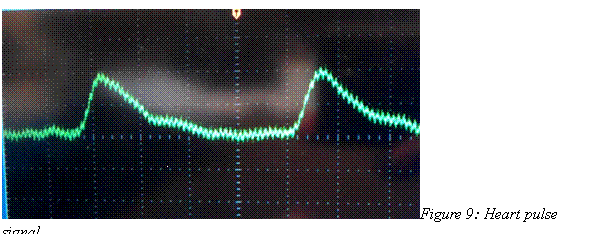
The device has to show the frequency of the hearth pulse of the human body in ppm. (Pulse per Minute). To detect the pulse signal a circuit with a LED and a LDR is used. These two elements are putted on the two sides of a finger. The light of the LED passes through the finger and the LDR measure its intensity by changing the resistance. When a heart pulse occurs blood is pumped in the finger, therefore the intensity of the light detect by the LDR decreases. This results in a pulse over the voltage signal (the resistance of the LDR increases while the light detected decreases). The electronic circuit used for interface the LED and the LDR with the microprocessor is reported in the schematic above (figure 4). The gain of the amplifier stage is about 200. The signal is highly dependent on the position of the LED and the LDR over the finger: the user has to find the correct position of the two components for displaying a measure, otherwise in the LCD will appear the written 'WAIT'. The signal is also dependent on the light of the environment. To avoid this effect the measure is made in a structure similar to a black box (figure 8).
In a certain position of the LED and LDR over the finger and with low environment light influence a signal with a shape similar to figure 9 is putted in input to the microprocessor, into an ADC converter. To correctly detect the heart rate is needed to measure the time between pulses. Since the signal is completely variable and the maximum and minimum values change continuously we need to use adaptive thresholds to do it. How it's deeper explained later two different thresholds would be used to better understanding the frequency. By using a hysteresis performance it's possible to avoid the effect of the noise observed over the signal due to the interference of the external factors (i.e. if electrical light is present it's possible to observe 50Hz noise over the signal, see figure 9).
To calculate the frequency of this signal the program performs the following steps:
1. Sampling the signal with single shot acquisition to find the maximum and minimum value. This analysis is performed over 100000 samples. The time between two samples is unknown but can be calculate considering the number of cycles needed by the operation between two samples. Anyway it's not important to know the sample rate: since not too many operations are executed during this time and since the frequency of the system is 8MHz, this time is enough shorter to investigate the maximum in the pulse. Moreover this high number of samples is required to find maximum and minimum and it's a good compromise with execution time as well.
2.
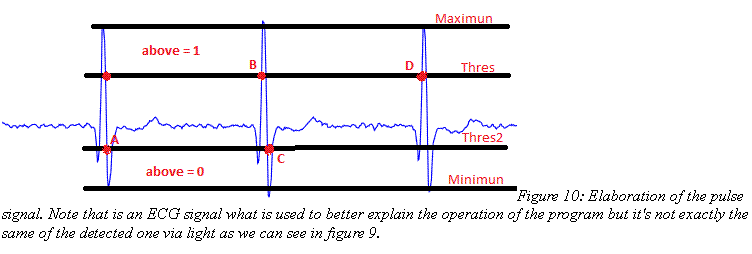 |
Two threshold are calculated, corresponding to the 60% and the 30% (thres and thres2) of the difference between maximum and minimum, as you can see in figure 10.
3. Then the signal is continuously analyzed until a value under thres2 is found. The global variable above is set to zero (point A in the figure)
4. The sampling process is continuously enable. Each sampled value is analyzed:
a) If the value is under thres nothing happens. When a value over thres is found the above variable is switched to 1 and a 16bit counter is enabled (point B).
b) When a sampled under thres2 is found, the variable above is switched again to 1 (point C).
c) When a sample over thres is detected the counter is stopped ant its value is stored. Then the counter is enabled again and the above variable is switched to 0 (point D).
d) If a sample under thres2 is found, above is set to 0. The program is in the same situation as at point b) and it can continue as before.
5. When the stored output value of the timer is a correct number (different from 0) a counter is increased (j).
Then the correspond frequency is calculated with the formula:
![]()
where ![]() is the output of the 16bit counter, 60 is due to
the fact that the device is calculating the pulses per minute and 10 because in
this way it's better to manage number with one decimal digit. The
is the output of the 16bit counter, 60 is due to
the fact that the device is calculating the pulses per minute and 10 because in
this way it's better to manage number with one decimal digit. The ![]() is chosen in a way that the maximum
is chosen in a way that the maximum ![]() correspond to a time greater than the maximum
possible measured time. For this reason the prescaler value is set to 1024.
correspond to a time greater than the maximum
possible measured time. For this reason the prescaler value is set to 1024.
Then the value of the calculated frequency are summed all together until j reach a certain number (N_average). This is due to the fact that an average can be calculated with this code. In this device N_average is set to 1.
6. When j=N_average the sampling process is stopped. If the calculated frequency is in an admissible range ( >50 and <200) the value is displayed in the LCD. Otherwise the user can read a written 'WAIT'.
The function pulse_measure_1() implements this process.
As mentioned above, the pulse measurement program is prepared to use different number of calculated frequencies to make an average. In this application no average is done because it's more interesting to see the real time value since the measurement is not always correct.
There is also another parameter ![]() to get more calculated frequency values before a
new calculation of the thresholds. By increasing the N_reset a faster
measurement is gotten but there is the possibility that the signal is changed
and the actual thresholds are no more correct and that could give a result in
an incorrect value for more time. In this device
to get more calculated frequency values before a
new calculation of the thresholds. By increasing the N_reset a faster
measurement is gotten but there is the possibility that the signal is changed
and the actual thresholds are no more correct and that could give a result in
an incorrect value for more time. In this device ![]() to get more precision measures.
to get more precision measures.
➢ SERIAL COMUNICATION
The device is set to communicate with a PC by a serial port. A software for the PC side is not implemented yet, anyway the communication can be test with simple testing software on the PC that can be read or write in the serial port. The settings for the communication are:
• Baud rate = 9600bps
• No parity bit
• 1 stop bit
• No flow control
According to figure 6, the user have to press the button 1 at the beginning of the program to open the connection to the PC. A global variable MODE is set to 1. Then the receiver and the transmitter of the microprocessor are enabled and the serial communication of the microprocessor is set to the previous values, by configuring the correspond registers. At this point the device waits until a '1' is received from the PC and when it's received it sends another byte (for example a '3'). With this exchange of data the connection is established.
If MODE is equal to 1 and the temperature or pulse measurement are running the user can send a byte from the PC to ask microprocessor to send the actual measured value. The microprocessor, before calculating a new value, can receive this order and send back to the PC the actual value with the function send_int(int a, char meas). This function sends 7 bytes: the first one is '1' if the value is a temperature or '2' if it's a pulse, the other 6 are the measurement. Note only that the received value from the microprocessor corresponds to the real value multiplied by a factor 10.
RESULT AND COMMENTS
• The temperature measure is working well. The calculated value shows a high precision result. The accuracy can be improved by comparing the measured value with a more accuracy measurement to understand the systematic error that affects the measure to calibrate the device.
• The pulse measure presents several problems. This results in a value highly variable. Only testing the device with the LED and the LDR in a certain position the calculated value results quite stable. In the figure 11 a well working obtained signal is shown and its corresponding value on the display.
Of course this value should be compared with an accuracy measurement to understand the error that affects the measure. Also to understand if the device it's really working well. To have a better measurement by using a LED and a LDR the following suggestion could be tested:
◦ Provide a better physical structure to putting the LED and LDR. This structure have to be fixed and have to prevent the environment light to go inside. Also there must be enough pressure between the finger and the two components.
◦ A better electronics interface circuit. Sometimes the obtained output signal doesn't present any pulse. More gain could be provided. Take care about the fact that only the AC component have to be amplified.
◦ Test a better LDR. During the test it was noted that the used LDR is degrading quickly probably by the contact with the finger and its humidity. A transparent tape is used over the sensor but could be not enough. The mechanical structure of an LDR sensor should be investigate.
These suggestions come from the tests done over the device. It was not possible implement
them either for the impossibility to find good resources (i.e. a physical structure to put LED and LDR) or for time deficiency. Anyway with this device it's possible demonstrate that under certain conditions (position of sensor, external light,..) it can detects a frequency.
• The serial communication is working well as the testing software on PC (for example “HyperTerminal”) can demonstrate. The code is thought to simple interface with a general PC software.
REFERENCES
• http://www.eit.lth.se/fileadmin/eit/courses/edi021/datablad/Display/LCD.pdf
• http://www.eit.lth.se/fileadmin/eit/courses/edi021/datablad/Sensors/LM35.pdf
• http://www.eit.lth.se/fileadmin/eit/courses/edi021/datablad/Processors/ATmega16.pdf
• Datasheets of MAX233A, Operational Amplifier CA3140ez
APPENDIX A – CODE
#include <avr/io.h>
#define F_CPU 8000000UL // 8 MHz
#include <util/delay.h>
#include <math.h>
#include <avr/interrupt.h>
#include <avr/signal.h>
//number of sample for calculate the average value of the temperature
#define N 600
//number of sample to find the maximun at the begininnig of the pulse
#define MAX_INIT 100000
//percentual for threshold
#define perc 0.6
//percentual for threshold2
#define perc2 0.3
//how many frequency pulse values to make an average
#define N_average 1
//number of dislayed values before come back to pulse initialization
#define N_reset 1
int EXIT; //variable for interrupt
char MODE; //=1 if a PC is connected
int freq_prev;
//at the beginning of the program the direction (and other functions)
//of pins is setted
void set_pin(){
DDRA=0x00; //port A input ADC
DDRB=0xff;
DDRC=0xc0;
DDRD=0xf2;
}
// usefull function for writing only one pin in a port without
// modifying the other pins value
//read the port, copy the value, modify pin and set again the register
void write_pin(char letter, unsigned long numb, char value){
char x; //x is a mask
x=(1 << numb);
switch (letter){
case 'A':
if (value == 1 ){
PORTA |= x; }
else{
x=~x;
PORTA &= x;}
break;
case 'B':
if (value == 1 ){
PORTB |= x; }
else{
x=~x;
PORTB &= x;}
break;
case 'C':
if (value == 1 ){
PORTC |= x; }
else{
x=~x;
PORTC &= x;}
break;
case 'D':
if (value == 1 ){
PORTD |= x; }
else{
x=~x;
PORTD &= x;}
break;
}
}
void write_data_LCD(char data) //enable signal and send data to DBx
{ PORTB=data; }
// Function that configures the LCD to receive instructions
void set_write_IR() { //set RS and RW for those operation
write_pin('D',PD4,0); //RS=0
write_pin('D',PD5,0); //RW=0
}
// Function that configures the LCD to receive data
void set_write_DR(){
write_pin('D',PD4,1); //RS=1
write_pin('D',PD5,0); //RW=0
}
void enable(){ //set E=1 of LCD
write_pin('D',PD6,1);
}
void disable(){ //E=0 of LCD
write_pin('D',PD6,0);
}
void initial_LCD(){
enable();
set_write_IR();
write_data_LCD(0x38); //function set -> 8bit mode
disable();
enable();
_delay_us (40);
write_data_LCD(0x01); //clear display
disable();
enable();
_delay_ms (2);
write_data_LCD(0x02); //cursor home
disable();
enable();
_delay_ms (2);
write_data_LCD(0x0c); //display on/off -> on, no cursor, no blinking
disable();
enable();
_delay_us (40);
}
void clear_LCD(){
set_write_IR();
write_data_LCD(0x01); //clear display
disable();
enable();
_delay_ms (50);
}
void next_line_LCD(){
set_write_IR();
//cursor shifted to the start of the second line
write_data_LCD(0b11000000);
disable();
enable();
_delay_us (400);
}
//function take a character and write on LCD
void write_char(char letter){
char t;
switch (letter){
case '0':
t=0x30;
break;
case '1':
t=0x31;
break;
case '2':
t=0x32;
break;
case '3':
t=0x33;
break;
case '4':
t=0x34;
break;
case '5':
t=0x35;
break;
case '6':
t=0x36;
break;
case '7':
t=0x37;
break;
case '8':
t=0x38;
break;
case '9':
t=0x39;
break;
case '-': // The "-" symbol will be considered a white space
t=0x20;
break;
case 'A':
t=0x41;
break;
case 'B':
t=0x42;
break;
case 'C':
t=0x43;
break;
case 'D':
t=0x44;
break;
case 'E':
t=0x45;
break;
case 'F':
t=0x46;
break;
case 'G':
t=0x47;
break;
case 'H':
t=0x48;
break;
case 'I':
t=0x49;
break;
case 'J':
t=0x4a;
break;
case 'K':
t=0x4b;
break;
case 'L':
t=0x4c;
break;
case 'M':
t=0x4d;
break;
case 'N':
t=0x4e;
break;
case 'O':
t=0x4f;
break;
case 'P':
t=0x50;
break;
case 'Q':
t=0x51;
break;
case 'R':
t=0x52;
break;
case 'S':
t=0x53;
break;
case 'T':
t=0x54;
break;
case 'U':
t=0x55;
break;
case 'V':
t=0x56;
break;
case 'W':
t=0x57;
break;
case 'X':
t=0x58;
break;
case 'Y':
t=0x59;
break;
case 'Z':
t=0x5a;
break;
case 'a':
t=0x61;
break;
case 'b':
t=0x62;
break;
case 'c':
t=0x63;
break;
case 'd':
t=0x64;
break;
case 'e':
t=0x65;
break;
case 'f':
t=0x66;
break;
case 'g':
t=0x67;
break;
case 'h':
t=0x68;
break;
case 'i':
t=0x69;
break;
case 'j':
t=0x6a;
break;
case 'k':
t=0x6b;
break;
case 'l':
t=0x6c;
break;
case 'm':
t=0x6d;
break;
case 'n':
t=0x6e;
break;
case 'o':
t=0x6f;
break;
case 'p':
t=0x70;
break;
case 'q':
t=0x71;
break;
case 'r':
t=0x72;
break;
case 's':
t=0x73;
break;
case 't':
t=0x74;
break;
case 'u':
t=0x75;
break;
case 'v':
t=0x76;
break;
case 'w':
t=0x77;
break;
case 'x':
t=0x78;
break;
case 'y':
t=0x79;
break;
case 'z':
t=0x7a;
break;
case ':':
t=0x3a;
break;
case '?':
t=0x3f;
break;
case '.':
t=0x2E;
break;
}
write_data_LCD(t);
disable();
enable();
_delay_us (40);
}
void write_initial_screen(){
set_write_IR(); //entry mode of this text
write_data_LCD(0x06);
disable();
enable();
_delay_us(40);
set_write_DR(); //write Select Measurment
write_char('S');
write_char('e');
write_char('l');
write_char('e');
write_char('c');
write_char('t');
write_char('-');
write_char('M');
write_char('e');
write_char('a');
write_char('s');
write_char('u');
write_char('r');
write_char('e');
next_line_LCD();
set_write_DR(); //write Select Measurment
write_char('1');
write_char('T');
write_char('e');
write_char('m');
write_char('p');
write_char('-');
write_char('-');
write_char('-');
write_char('2');
write_char('P');
write_char('u');
write_char('l');
write_char('s');
write_char('e');
}
void write_temp_screen(){
set_write_IR(); //entry mode of this text
write_data_LCD(0x06);
disable();
enable();
_delay_us(40);
set_write_DR();
write_char('T');
write_char('e');
write_char('m');
write_char('p');
_delay_ms (500);
}
void write_pulse_screen(){
set_write_IR(); //entry mode of this text
write_data_LCD(0x06);
disable();
enable();
_delay_us(40);
set_write_DR();
write_char('P');
write_char('u');
write_char('l');
write_char('s');
write_char('e');
_delay_ms (500);
}
//function used when the heart rate value is not correct
void write_error_screen(){
set_write_IR(); //entry mode of this text
write_data_LCD(0x06);
disable();
enable();
_delay_us(40);
set_write_DR();
write_char('W');
write_char('a');
write_char('i');
write_char('t');
write_char(' ');
write_char(' ');
}
//it is a function that returns 1 if you press the button 1 and returns
//2 if you press the button 2. wait until one buttom is released.
int buttom(){
char flag = 0;
char input;
while (flag==0){
input = PINC&0x01 ;
if (input== 0x00 ){
_delay_ms(200);
while (input== 0x00){input = PINC&0x01 ;};
flag = 1; }
else {input = PINC&0x02 ;
if (input== 0x00 ){
_delay_ms(200);
while (input== 0x00){input = PINC&0x02 ;};
flag = 2; }}
}
return flag;
}
//start the adc convertion
void start_conv(){
char t;
t= (1<<ADSC);
ADCSRA|=t;
}
//this show in the LCD a number between 0 to 1024 in a int variable
//It's necessary to convert the decimal number to different characters in order to be displayed
void send_int(int a, char meas){
char t1,t2,t3,t4,t5,t6;
t1 = a%10;
t2 = (a/10)%10;
t3 = (a/100)%10;
t4 = (a/1000)%10;
t5 = (a/10000)%10;
t6 = (a/100000)%10;
char p;
// start of the code necessary to do the serial communication
//send type of measure
while ((UCSRA & (1 << UDRE)) == 0) {}; //do nothing until buffer is empty
UDR = meas+0x30;
//send data
p=t6+0x30;
while ((UCSRA & (1 << UDRE)) == 0) {};
UDR = p;
p=t5+0x30;
while ((UCSRA & (1 << UDRE)) == 0) {};
UDR = p;
p=t4+0x30;
while ((UCSRA & (1 << UDRE)) == 0) {};
UDR = p;
p=t3+0x30;
while ((UCSRA & (1 << UDRE)) == 0) {};
UDR = p;
p=t2+0x30;
while ((UCSRA & (1 << UDRE)) == 0) {};
UDR = p;
p=t1+0x30;
while ((UCSRA & (1 << UDRE)) == 0) {};
UDR = p;
}
void write_int_LCD(int a ){
int t1,t2,t3,t4,t5,t6;
t1 = a%10;
t2 = (a/10)%10;
t3 = (a/100)%10;
t4 = (a/1000)%10;
t5 = (a/10000)%10;
t6 = (a/100000)%10;
char p;
p = t6;
if (p!= 0){
p+=0x30;
write_data_LCD(p);
disable();
enable();
_delay_us (40);
}
p = t5;
p+=0x30;
write_data_LCD(p);
disable();
enable();
_delay_us (40);
p = t4;
p+=0x30;
write_data_LCD(p);
disable();
enable();
_delay_us (40);
p = t3;
p+=0x30;
write_data_LCD(p);
disable();
enable();
_delay_us (40);
p = t2;
p+=0x30;
write_data_LCD(p);
disable();
enable();
_delay_us (40);
write_char('.'); //decimal dot
p = t1;
p+=0x30;
write_data_LCD(p);
disable();
enable();
_delay_us (40);
}
//simple procedure for temperature measure. single shot acquisistion
//This function will collect the temperature data and make the average
int temp_measure(){
char t;
int HVAL,LVAL, prova, i;
double temp;
long int sum;
sum=0;
for(i=0;i<N;i++) {
// N is declared in the beginning of the file to easy reconfiguration
ADMUX = 0xc0;
ADCSRA =0b10000000;//BIT 3 INTERRUPT DISABLE
start_conv();
t=0;
while (t==0) {t = (ADCSRA & 0x10);};
LVAL = ADCL;
HVAL = ADCH & 0x03;
//HVAL is shifted 8 bits to get the total value of 10 bits.
LVAL = (HVAL*256)+LVAL;
// Vref=2,56V ,2^10 bits , 1000=100(10mV per degree)*10(one decimal digit)
temp = LVAL*(2.56/(1024))*1000;
sum += temp; //average
_delay_us(311);
};
prova = sum/N;
// prova contain the value of temperature that will be show in the LCD
// the temp value is obtained by a mean of N sample of the sensor
// insert here any data elaboration of this value before showing
write_int_LCD(prova);
return prova;
}
//configuration of the interruption (for resetting)
void set_interrupt(){
char x; //x is a mask
x = 0x03;
MCUCR |= x; //int0 generates intererrupt on rising edge
x=0x40;
GICR |= x; //interrupt int0 enable
}
void enable_interrupt()
{
char x; //x is a mask
x = 0x80;
x= ~x;
GIFR &= x;
x = 0x80;
SREG |= x;
}
void disable_interrupt()
{
char x; //x is a mask
x = 0x80;
x= ~x;
SREG &= x;
}
//Routine of the interruption which changes the flag of resetting
SIGNAL (SIG_INTERRUPT0){
EXIT = 1;
}
//Main calculation of the pulse measurement
void pulse_measure_1(){
char t,above,b;
int HVAL,LVAL, max,min;
long int i;
long int j;
int time;
double freq;
double sum;
int k=0;
int thres,thres2;
ADMUX = 0b01000001; //channel1 selected, Aref
ADCSRA =0b10000000; //enable ADC
TCCR1B=0; //timer off
TCNT1 =0; // Reset timer value
start_conv();
t=0;
while (t==0) {t = (ADCSRA & 0x10);}; //check if sample is ready
LVAL = ADCL;
HVAL = ADCH & 0x03;
LVAL = (HVAL*256)+LVAL;
max = LVAL;
min = LVAL;
//We check the maximun and minimum during a little bit more than a period
for (i=0;i<MAX_INIT;i++)
{
start_conv();
t=0;
//check if sample is ready
while (t==0) {t = (ADCSRA & 0x10);};
LVAL = ADCL;
HVAL = ADCH & 0x03;
LVAL = (HVAL*256)+LVAL;
if(LVAL<min) min= LVAL;
if (LVAL>max) max=LVAL;
}
//calculation of the thresholds with those previous values
thres = min + ((max-min)*perc);
thres2 = min + ((max-min)*perc2);
//code necessary to enter correctly in the correct case of above (1 or 0)
above=2;
while(above!=0){
start_conv();
t=0;
while (t==0) {t = (ADCSRA & 0x10);}; //check if sample is ready
LVAL = ADCL;
HVAL = ADCH & 0x03;
LVAL = (HVAL*256)+LVAL;
// We are above or below the threshold?
if (LVAL>thres) above=1;
if (LVAL<thres2) above=0;
}
sum=0;
while(1){
j=0;
while(j<N_average){
if(MODE==1){
//if something received send the data
if((UCSRA & (1 << RXC)) != 0) {
b=UDR;
send_int(freq_prev, 2); }
}
// Check the interrupt flag and jump outside the function if it's necessary
if (EXIT==1) {
goto RESET;}
start_conv();
t=0;
while (t==0) {t = (ADCSRA & 0x10);}; //check if sample is ready
LVAL = ADCL;
LVAL = (ADCH*256)+LVAL;
//structure of state diagram distinguish the above and below case
switch(above)
{
case 0: {
if (LVAL>thres) {
// timer() capability start;
TCCR1B=0; //timer off
time = TCNT1; //collect the value of the timer
TCNT1 =0; //reset the timer
TCCR1B |= ((1 << CS10) | (1 << CS12));//timer on
if (time!=0) { //if something received send the data
if(((UCSRA & (1 << RXC)) != 0)) { send_int(freq, '2'); }
//4915200=8MHz (ferquency)*60(minute)*10(decimal)
freq = (4915200)/time;
sum += freq;
j++;
}// timer() capability finish;
above=1;
}
break;
}
case 1: {
if (LVAL<thres2) { above=0;}
}
}
}
next_line_LCD();
set_write_DR();
freq=sum/N_average;
//Range of correct pulse between 50 and 200 ppm
if ((freq<500)|(freq>2000)) write_error_screen();
else {write_int_LCD(freq);
freq_prev=freq; }
sum=0;
if (k<N_reset) k++;
else { k=0;
goto RESET;}
} //close while(1)
RESET:
TCCR1B=0; //timer off
TCNT1 =0; // Reset timer value
sum=0;
} //close function
void write_initial_screen_0(){
set_write_IR(); //entry mode of this text
write_data_LCD(0x06);
disable();
enable();
_delay_us(40);
// Show in the Screen PC Connected Press one for yes and Two for no
set_write_DR();
write_char('P');
write_char('C');
write_char('-');
write_char('C');
write_char('o');
write_char('n');
write_char('n');
write_char('e');
write_char('c');
write_char('t');
write_char('e');
write_char('d');
write_char('?');
next_line_LCD();
set_write_DR();
write_char('1');
write_char('Y');
write_char('e');
write_char('s');
write_char('-');
write_char('-');
write_char('-');
write_char('-');
write_char('2');
write_char('N');
write_char('o');
}
void main(void)
{
int a,b, measure;
b=0;
set_pin();
initial_LCD();
START: //starting point after reset
{EXIT=0;
MODE=0; //MODE=1 if we want to connect to PC
freq_prev=0;
disable_interrupt();
set_interrupt();
clear_LCD();
write_initial_screen_0();
MODE=buttom(); //choose if the PC is connected
if (MODE==1){
enable_interrupt();
clear_LCD();
set_write_IR(); //entry mode of this text
write_data_LCD(0x06);
disable();
enable();
_delay_us(40);
set_write_DR();
write_char('W');
write_char('a');
write_char('i');
write_char('t');
write_char('i');
write_char('n');
write_char('g');
write_char('-');
write_char('P');
write_char('C');
//enable serial communication and setting parameters
UCSRB |= (1 << RXEN) | (1 << TXEN);
UCSRC |= (1 << URSEL) | (1 << UCSZ0) | (1 << UCSZ1);
UBRRH = 0x00;;
UBRRL = 0x33;//=51 (9600bps at 8MHz) look table on datasheet
_delay_ms(1000);
//receive 1 from PC to start the communication
//until a 1 is received indicating the PC is ready the program cannot go on
do{
while((UCSRA & (1 << RXC)) == 0) {
enable(); //is for the RESET
if (EXIT==1) {goto START;}};
b=UDR;
write_char(b);
}while(b!='1');
b=0;
_delay_us(100);
//send a byte to the PC
while ((UCSRA & (1 << UDRE)) == 0) {}; //do nothing until buffer is empty
UDR = 0x33;
clear_LCD();
set_write_IR(); //entry mode of this text
write_data_LCD(0x06);
disable();
enable();
_delay_us(40);
set_write_DR();
write_char('P');
write_char('C');
write_char('-');
write_char('M');
write_char('o');
write_char('d');
write_char('e');
write_char('-');
write_char('O');
write_char('N');
//to have enough time to visualize the written before
_delay_ms(1000);
}
clear_LCD();
_delay_ms(1000);
write_initial_screen();
//from this point we wait for the preassure of the button
a = buttom();
enable_interrupt();
switch (a) { //type of measurament
case 1:
_delay_ms(500);
clear_LCD();
write_temp_screen();
//the measurement of the temperature is continously running
while(1){
//exit point for resetting the device
if (EXIT==1) {
goto START;}
next_line_LCD();
set_write_DR();
//temperature is calculated and displayed
measure = temp_measure();
if(MODE==1){ //if PC is connected
//if something is received from the PC the device send the temp data back
if((UCSRA & (1 << RXC)) != 0) {
b=UDR;
send_int(measure, 1); } //the 1 indicates temperature measure
_delay_ms(1000);
}
_delay_ms(400);
}
break;
case 2: clear_LCD();
write_pulse_screen();
//pulse measurement is continuosly running
while(1){
if (EXIT==1) {
goto START; }
pulse_measure_1();
}
break;
default: write_char('X'); //only for debugging
}
}
}